Select Import File Listing in the Project menu to read a list of file paths from one or more text files, and then open the files indicated by the paths in that list.
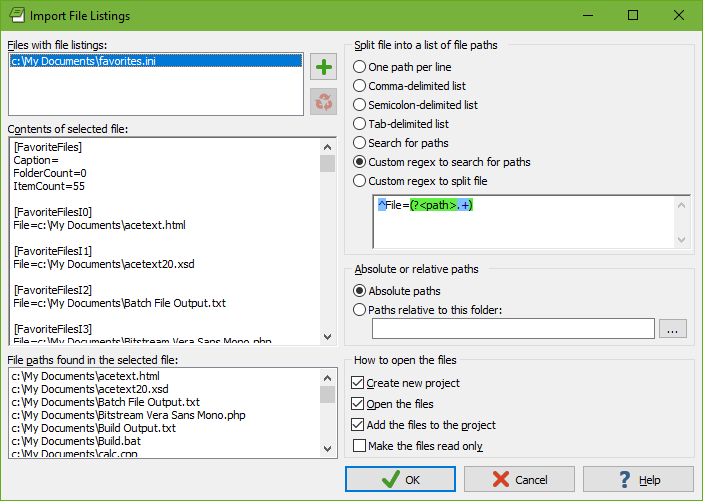
In the window that appears, click the button with the green plus symbol next to the “files with file listings” list to select one or more text files that list the files or folders you want to search through. You can use the green plus button repeatedly to add files from different folders to the list. The red X button deletes the selected file from the list.
Click on one of the files that you added to the “files with file listings” list. EditPad Pro then shows the raw contents of that file in the “contents of the selected file” box. EditPad Pro also shows the file and folder paths that it has detected in that file in the “file paths found in the selected file” list. The settings on the right-hand side of the Import File Listings screen determine how EditPad Pro detects those paths. EditPad Pro automatically filters out anything that does not look like a valid path.
Choose one of the options in the “split file into a list of file paths” box to tell EditPad Pro how your list of paths is delimited. If your list doesn’t use a consistent delimiter, select “search for paths” to tell EditPad Pro to extract all absolute paths from the file, regardless of any other text that may occur in the file. If you want EditPad Pro to extract only certain paths from the file, select one of the two “custom regex” options and type in a regular expression in the box below them. The “custom regex to search for paths” option needs a regular expression that matches the paths you want to mark in the file selection. EditPad Pro uses the whole regex match as the path unless it contains a named capturing group called “path”. E.g. ^File=(?'path'.*) extracts the paths from “File” values in an .ini file. The “custom regex to split file” option needs a regular expression that matches the delimiters between those paths. E.g. [\r\n;]+ allows line breaks and semicolons as delimiters.
If you select “absolute paths”, EditPad Pro only uses fully qualified paths such as c:\folder\file.txt and \\server\share\folder\file.txt. Any relative paths in the file listing you’re importing are ignored. If you want EditPad Pro to process relative paths as well then you need to select the “paths relative to this folder option”. Type in the base folder below that option, or click the (...) button to select it from a folder tree. Note that if your file contains text in addition to paths, you need to use one of the “custom regex” options to tell EditPad Pro how to find only the actual paths. Otherwise, EditPad Pro will treat each word in the text as a file name. You cannot use the “search for paths” option because that option finds absolute paths only, regardless of the “absolute or relative paths” setting.
Once you’ve set the options that make EditPad Pro find the paths that you want to import, you need to tell EditPad Pro what you want to do with the files those paths point to. Tick “create new project” to open the files into a new, untitled project. This is the same as using Project|New Project before using Project|Import File Listings.
Tick “open the files” to make EditPad Pro actually open all of the files. If you turn this off, then “add files to the project” is automatically turned on, and EditPad Pro adds the files to the project without opening them. The files will show up in the Files Panel as closed files. Since only managed projects can contain closed files, turning off “open the files” automatically changes the current or the new project that the files are added into a managed project.
Tick “add the files to the project” to add the files to the project. If you turn this off, then “open the files” is automatically turned on, and the files will be opened as outside files, without adding them to the project. Since only managed projects can have files open that aren’t part of the project, turning off “add the files to the project” automatically changes the current or the new project that the files are opened into a managed project.
Tick “make the files read only” to open the files in read-only mode.
The Import File Listings item has a submenu that lists recently imported file listings. Each time you use Project|Imported File Listing, the files you imported are added to the top of this submenu. If you imported a single file, the submenu lists the full path to the file. If you imported multiple files at once, the submenu has one item with a comma-delimited list listing all the file names that fit within the maximum length for a menu item. The submenu item remembers all the settings you made in the Import File Listings window. When you select one of the remembered file listings from the submenu, it is imported again using the exact same settings.
“Remove Obsolete” removes all files that no longer exist from the Import File Listings submenu. This removes all file listings that try to import from a file that no longer exists. If a file listing imports from files that still exist, but no paths can be found in those files, then the file listing is removed as well.
Project menu
Project|Managed Project
Project|Export File Listing