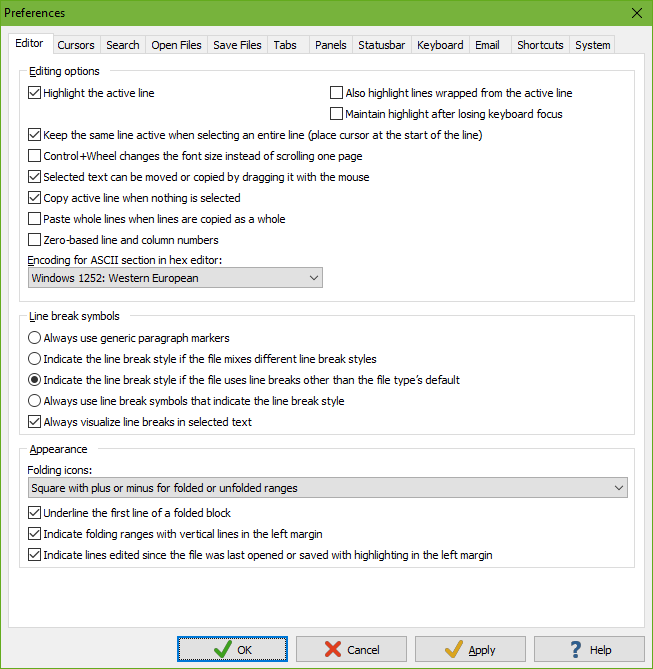
On the Editor tab of the Preferences you can set the options that affect basic editing tasks that are not file type specific.
Highlighting the active line makes it easier to keep track of where you are in the file, particularly when switching between EditPad and other applications. The active line is the line the text cursor is on. You can turn on “also highlight lines wrapped from the active line” to highlight the entire paragraph that the active line is part of when word wrap is on. This option has no effect when word wrap is off. Just like the text cursor itself, the active line is only highlighted when the editor has keyboard focus. If you want it to be highlighted permanently, turn on “maintain highlight after losing keyboard focus” too. You can configure the color of the active line in the color palette for each file type. Click on “editor: highlight active line” in the list. Click the Background Color button to change the highlight color.
You can select an entire line by double-clicking its line number, Ctrl+double clicking the line itself, or triple-clicking the line itself. The selection will include the line break at the end of the line. If you turn on “keep the same line active when selecting an entire line” then EditPad places the cursor at the start of the selected line. This way the selected line is the line that is highlighted as the active line. Shift+Arrow Up will expand the selection while Shift+Arrow Down will clear the selection. If you turn off this option then EditPad places the cursor at the end of the selection, which is at the start of the next line. The line below the selection will be highlighted as the active line. Shift+Arrow Up will clear the selection while Shift+Arrow Down will expand the selection.
In EditPad, rotating the mouse wheel scrolls the active file 3 lines up or down. Holding down the Ctrl key while rotating the mouse wheel scrolls the active file one screen up or down. Essentially, holding down the Ctrl key speeds up scrolling with the mouse wheel. In many other applications, Ctrl+Wheel zooms in our out. As a plain text editor, EditPad Pro does not have the ability to zoom. But EditPad Pro can mimic zooming by increasing or decreasing the font size of the active file. Turn on “Control+Wheel changes the font size instead of scrolling one page” if you prefer to change the font rather than to scroll quickly when using Ctrl+Wheel.
By default, “selected text can be moved or copied by dragging it with the mouse” is turned on. This allows drag-and-drop editing within EditPad. It also allows you to drag text from EditPad into other applications. People with limited dexterity using a mouse may find themselves accidentally moving text when trying to select text. Turning off this option prevents that.
In EditPad, the Edit|Cut and Edit|Copy are always enabled by default. If no text is selected, these commands cut or copy the active line. This allows you to quickly cut and copy whole lines, as it removes the need to select them. You can turn off the option “copy active line when nothing is selected” if you want EditPad to disable the Cut and Copy commands when no text is selected, as most Windows applications do.
Normally, when you paste text, that text is inserted at the position of the text cursor, regardless of where the cursor is placed and which text is being pasted. If you often copy and paste whole lines of text, you may want to turn on “paste whole lines when lines are copied as a whole”. A line is copied as a whole if all the text on that line and the line break at the end of the line are selected when you copy them. If the option to paste whole lines is on, and you copy a whole line in EditPad, and then paste it, the line is pasted before the line that the cursor is on, as if the cursor was positioned at the start of the line. This allows you to quickly copy and paste whole lines without worrying about the horizontal position of the text cursor. This option also affects the Block|Move and Block|Duplicate commands in the same way. If you move or duplicate a whole line, the line is moved or copied as if the cursor was on the start of the line that it is on. This option only affects whole lines copied in EditPad. When pasting text copied from another application, EditPad cannot determine whether it was a complete line or not.
Turn on “zero-based line and column numbers” if you want EditPad Pro to start counting lines and columns from zero instead of one. This option affects the status bar, as well as Options|Line Numbers and Options|Column Numbers.
Normally, the ASCII section in the hex editor uses the file type’s encoding or its non-Unicode encoding to translate bytes into characters for display in the right-hand section of the hex editor and for translating characters that you type into bytes. But the hex editor can only work with 8-bit code pages as it displays one character per byte. If neither the file type’s encoding nor its non-Unicode encoding are 8-bit code pages then the hex editor falls back to the “encoding for the ASCII section in the hex editor” that you specify here in the Editor Preferences.
You can show or hide line break symbols with the Options|Visualize Line Breaks command. You can set the default in the editor options for each file type. These two determine whether line breaks are visualized or not. The Line Break Symbols section in the Preferences determines how they are visualized.
Line breaks are visualized with stair-stepped letters as follows:
If you choose to show the generic ¶ symbol then you’ll need to rely on the status bar to determine the line break style used by the file.
By default, EditPad shows line break symbols for all line breaks that are part of a selected block, even when you’ve turned off the option to visualize line breaks. EditPad Lite, which does not have any options for visualizing line breaks, does this too. This makes it easy to tell the difference between selecting a line of text and selecting a line of text including the line break at the end of the line. In EditPad Pro, you can disable this by turning off “always visualize line breaks in selected text”. If you do this, there is no visual difference between selecting a line with or without the line break that terminates it.
When you use the Fold|Fold command to fold a range of lines, EditPad Pro indicate the folding point or foldable range with a folding icon in the left margin. The icon is different depending on whether the folding point is folded or unfolded. The default is a square with a plus for folded ranges and a minus for unfolded ranges. This is similar to how folded nodes in tree views were indicated in older versions of Windows. The second option is a filled square for folded ranges and a hollow square for unfolded ranges. The final option is a rightward pointing chevron for folded ranges and a downward pointing chevron for unfolded ranges. This is similar to how folded nodes in tree views are indicated in recent versions of Windows. To change the color of the folding icons, customize the color palette and change the “Editor: Folding icons” color.
When the range is folded, only its first line remains visible. To make it more obvious that some lines are hidden, turn on “underline the first line of a folded block”. What this option really does is to layer the “Editor: Folded line” color from the color palette onto the first line of folded ranges. You can customize the color palette to apply a background highlight or change the text color instead of or in addition to underlining the line. You can of course change the underline style and color too.
When the range is unfolded, the second and following lines in the range are indicated with a vertical line in the left margin. This vertical line has a kink on the last line in the range to make it more obvious where the range ends. When folding ranges are nested, up to 3 vertical lines can appear side by side in the left margin. When folding ranges are nested 4 or more levels deep, the 4th and deeper levels do not get an extra vertical line. But they still add a little horizontal bump to the vertical line to indicate the last line in the folding range. If you find the vertical lines distracting then you can disable them. Then only the folding icons appear. You may prefer this style if you only work with automatic folding ranges that span logical blocks that are obvious from the file’s content and you don’t need an extra indicator to see where each range ends.
Turn on “indicate lines edited since the file was last opened or saved with highlighting in the left margin” if you want EditPad to keep track of which lines you’ve edited. When this option is off, EditPad does not track edited lines at all. So turning it on only shows indicators for lines you edit after turning on the option. To change the color of the indicators, customize the color palette and change the two “Editor: Line edited since file last opened/saved” colors. Specify a background color if you want to fill in the whole margin area (but not line numbers if they are shown). Specify a vertical line style if you want a thin vertical line immediately to the left of edited lines.
When you edit a line, it is highlighted in the margin with the “line edited since file last saved” color. When you save the file, all lines highlighted that way change their highlight to the “line edited since file last opened” color. If you edit such a line again, its highlight changes to “line edited since file last saved” again.
If you undo an edit that you made after you last saved the file (or if you didn’t save the file since last opening it) then the margin highlighting applied by the edit is undone as well. If you save the file and then undo an edit that you made before you saved the file then lines affected by the undo become highlighted as “line edited since file last saved”.