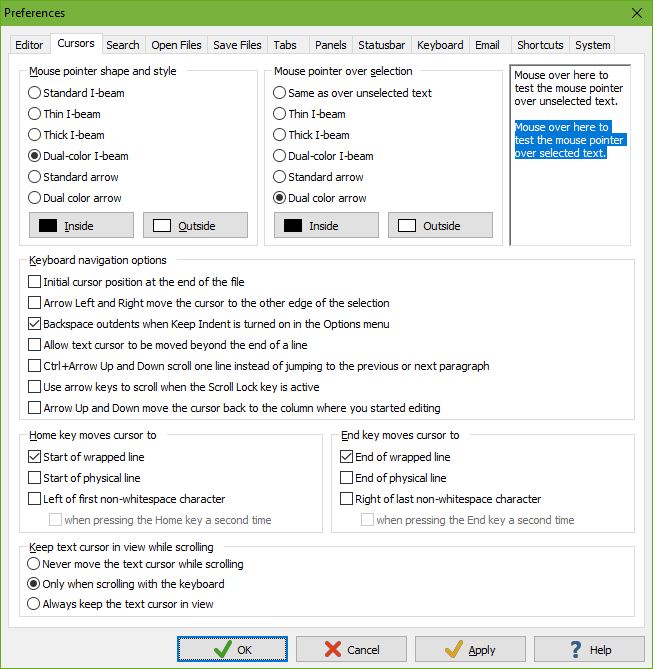
On the Cursors tab in the Preferences screen, you can configure the appearance of EditPad’s mouse pointer. You can also configure how EditPad responds to the navigational keys on the keyboard.
The appearance of the text cursor (blinking vertical bar) cannot be set in the Preferences. That can be set in the text layout configuration because EditPad’s text cursor can indicate text direction.
EditPad Pro allows you to select the mouse pointer shape and style. “Standard I-beam” is the standard mouse pointer for text editing controls, typically an I-shaped beam. “Thin I-beam”, “thick I-beam” and “dual-color I-beam” are custom EditPad cursors for which you can pick your own colors. By choosing colors that contrast well with the background color you’ve chosen for the editor, you can make the mouse pointer highly visible. “Standard arrow” is the regular Windows mouse pointer. “Dual color arrow” is another custom EditPad cursor in the shape of an arrow.
EditPad’s custom pointers may not work in all situations. Some remote desktop software, for example, cannot handle them. The mouse pointer may either be incorrectly displayed, or simply be invisible. In that case, simply select one of the standard pointers, which always work.
If you open a file you’ve never opened before, or if you turned off the option to preserve the cursor position on the Save Files page, then EditPad places the cursor at the very start of the file. You can turn on “initial cursor position at the end of the file” if you want the cursor to be at the end of the file instead. This works even with huge files. When you open a large file, EditPad scans the file for line breaks from top to bottom and from bottom to top at the same time. So both the start and end of the file are immediately accessible. Regardless of where you initially have the cursor, you can press Ctrl+Home to jump to the start of the file or Ctrl+End to jump to the end of the file immediately after opening it.
In some editors, like Notepad, pressing Arrow Left or Right moves the cursor one character left or right and clears the selection if there is one. In other editors, like Wordpad, pressing Arrow Left or Right while there is a selection puts the cursor on the left or right edge of the selection and then clears the selection. By default, EditPad behaves like Notepad. If you turn on “arrow Left and Right move the cursor to the other edge of the selection” then EditPad behaves like Wordpad. This option only has an effect when Block|Persistent Selections is off. When selections are persistent, the Left and Right arrow keys always move the cursor one character and never clear the selection. (Notepad and Wordpad do not support persistent selections.)
If you turn on Keep Indent in the Options menu or in the editor options in the file type configuration then pressing Enter to create a new line automatically duplicates all whitespace at the start of the previous line onto the new line. When Keep Indent is on, there are two ways in which the Backspace key can delete this whitespace at the start of a line. If you turn on “Backspace outdents” then pressing Backspace deletes as many whitespace characters as needed to line up the cursor with the previous indentation level. That is the amount of spaces used to indent the first line before the line the cursor is on that has less indentation than the horizontal position of the text cursor when you press the Backspace key. So if you start with a blank file, type 3 spaces, type text, press Enter (which indents the new line by 3 spaces), type 3 more spaces, type text, press Enter (which indents the 3rd line by 6 spaces) and then press Backspace, then 3 spaces are deleted to line up the cursor with the first line’s indentation. Pressing backspace again deletes 3 more spaces. If you turn off “backspace outdents”, then pressing Backspace always deletes one character. This option has no effect when Keep Indent is off. In that case backspace always deletes one character.
If you turn on “allow text cursor to be moved beyond the end of a line”, you can position the text cursor after the last character of the line. If you press the right arrow key when the cursor is at the end of the line, it moves one position to the right. If you click with the mouse beyond the end of the line, the cursor is placed where you clicked. If you start typing when the cursor is beyond the end of the line, EditPad automatically fills up the line with spaces up to the position where you started typing. When you do not allow the cursor to be moved beyond the end of a line, pressing the right arrow key when the cursor is at the end of a line moves it to the start of the next line. When you click the mouse beyond the end of the line, the cursor is placed after the last character on the line.
You can choose what happens when you press Control+Arrow Up or Down on the keyboard. By default, this scrolls the text one line up or down without moving the text cursor, as if you had clicked on the up or down arrow button on the scroll bar, or as if you had rotated the mouse wheel. Ctrl+Arrow Up and Down work this way in most programmer’s text editors. If you prefer to use the mouse rather than the keyboard for scrolling, you can configure the Ctrl+Arrow Up and Down keys to make the text cursor jump to the next or previous paragraph. Ctrl+Arrow Up and Down work this way in some word processors such as Microsoft Word.
If you turn on “use arrow keys when the Scroll Lock key is active”, then you can push the Scroll Lock key on the keyboard to scroll with the arrow keys. Pressing any of the arrow keys then scrolls the view instead of moving the text cursor. The Home and End keys scroll to the top and the end of the file. Press Scroll Lock again to restore the normal arrow key behavior. If this option is off then EditPad Pro ignores the state of the Scroll Lock key.
In Windows text editors, pressing the Arrow Up or Down keys on the keyboard keeps the text cursor on the same column. For example. if you put the cursor on line 1, column 1 of an existing text file, type “abc”, and then press Arrow Down, then the cursor will be on line 2, column 4. If you type “abc” on the 2nd line, it will be “stair-stepped” relative to the “abc” on the first line. If you turn on the option “Arrow Up and Down move the cursor back to the column where you started editing”, then in the previous example, pressing Arrow Down moves the cursor to line 2, column 1. The horizontal movement caused by typing “abc” is undone by pressing Arrow Down. If you type “abc” on the second line, it will appear just below the “abc” on the first line. The result is that turning on this option makes it much easier to edit data arranged in columns.
EditPad lets you configure the behavior of the Home key and End key independently. The same options are available for both keys.
The “wrapped line” and “physical line” options come into play when word wrap is enabled. A “wrapped line” is one line of text as it appears in EditPad. A “physical line” is the text between two line breaks or one paragraph of text. Turning “wrapped line” on and “physical line” off gives you the traditional behavior of the Home and End keys in a word processor. Turning “wrapped line” off and “physical line” on make the Home and End keys oblivious to word wrapping. Turning on both makes the first key press move to the start or end of the line (if not already there) and the second press to the start or end of the paragraph. A third press does not move the cursor back to the line that it was on originally.
Traditionally the Home and End keys move the cursor to the very start or very end of the line. In some modern editors, the Home key moves it to the left of the first non-whitespace character of the line it is on and the End key to the right of the last non-whitespace character. This is sometimes known as a “smart Home key” or “smart End key”. EditPad has these options too. If the cursor is already to the left/right of the first/last non-whitespace character then the Home/End key moves the cursor to the very start/end of the line. If the cursor is already at the very start/end of the line then it is moved to the left/right of the first/last non-whitespace character. Repeatedly pressing Home or End will keep moving the cursor between those two positions. If the cursor is on another position on the line then the option “when pressing the key a second time” determines what happens. If this is off then the first press of the Home/End key moves the cursor next to the first/last non-whitespace character. If it is on then the first key press moves the cursor to the very start or end of the line.
If you turn on the option to move the cursor next to the first/last non-whitespace character and also turn on both “wrapped lines” and “physical lines” then there are potentially four positions that the cursor could be moved to depending on whether the line that the cursor is on has trailing whitespace and whether the paragraph that the line is part of has leading or trailing whitespace. If all four positions are possible then the first two key presses move the cursor to the two positions on the wrapped line as described in the previous paragraph. The third key press then moves the cursor to the first or last line in the paragraph, either at the very start/end or next to the first/last non-whitespace character depending on the “when pressing the key a second time” option. Further presses then cycle between those two positions on the first or last line in the paragraph.
“Keep text cursor in view while scrolling” determines what happens to the text cursor when you scroll the text. Normally, the text cursor keeps its position relative to the text when you scroll the text. This may cause the text cursor to be scrolled off-screen. Depending on your text editing habits, this may be desirable or undesirable. If you allow the text cursor to be scrolled off-screen, it keeps its position relative to the text. After scrolling, you can immediately continue typing at the same position. When you do so, the text is scrolled automatically to make the cursor visible again. If you choose to keep the text cursor visible, it is moved to the topmost or bottommost visible line when scrolling would otherwise have made it invisible. This way, you can always see exactly where the text cursor is pointing to.
By default, EditPad Pro keeps the text cursor visible when you scroll with the keyboard (by pressing Ctrl+Arrow Up/Down or Ctrl+Page Up/Down), but not when you scroll with the scroll bars or by rotating the mouse wheel. This is how most text editors for programmers work. EditPad Pro gives you the choice. Most general-purpose text editors do not allow keyboard scrolling at all.