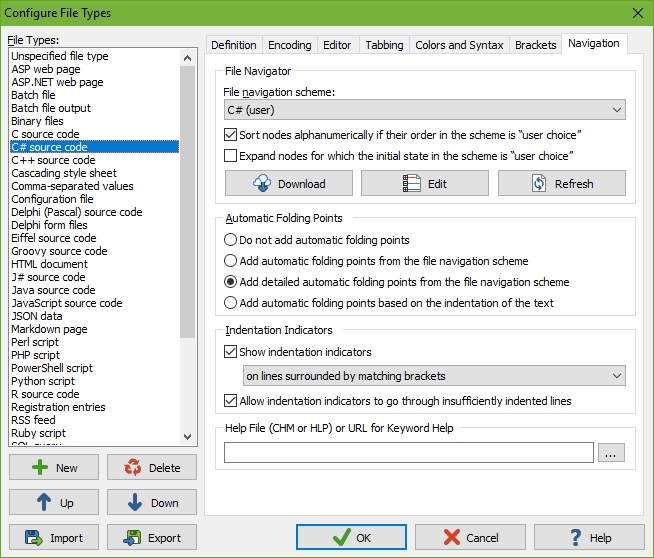
On the Navigation page in the file type configuration, you can configure the file navigation and line folding text editing aids.
You can access the File Navigator by selecting View|File Navigator in the menu. The File Navigator displays the structure of the file in a collapsible tree. By clicking on items in the tree, you can quickly navigate to various parts of the file.
The File Navigator requires a file navigation scheme to do its job. You can select a predefined scheme from the file “navigation scheme” drop-down list.
If no file navigation scheme is available for the file type you are defining, click the download button. EditPad Pro then connects to the Internet and allows you to download file navigation schemes created and shared by other EditPad Pro users. To create your own file navigation schemes, use the File Navigation Scheme Editor. After editing a scheme or creating new ones, click the Refresh button to make EditPad Pro read in the new and edited schemes.
Automatic folding points appear as small squares in the left margin, with a vertical line extending down from the square to indicate the range. These allow you to quickly fold logical parts of the text to get a better overview of the overall structure. You can change their appearance on the Editor page in the Preferences. When EditPad Pro adds automatic folding points, any unused (i.e. expanded) folding points you created with Fold|Fold and Fold|Unfold are removed.
EditPad Pro can obtain automatic folding points from two sources. Many, but not all, file navigation schemes also define foldable ranges when they associate different parts of the file with various nodes in the file navigation tree. These ranges usually follow the syntax of the file. Some file navigation schemes mark some of their foldable ranges as being “detailed”. For example, schemes for C-style languages add regular folding ranges for classes and functions, and detailed folding ranges for all other pairs of curly braces. If you select to add automatic folding points from the file navigation scheme then only the regular folding ranges appear in EditPad Pro. If you select to add detailed automatic folding points from the file navigation scheme then regular and detailed folding ranges appear in EditPad Pro. Both types of folding ranges behave in exactly the same way. The only difference is that the detailed ranges only show up when you choose.
Alternatively, EditPad Pro can use a file’s indentation as the basis for folding points. Whenever a line is followed by one or more lines that are indented further than itself, that line becomes a folding point. Its range stops before the next line with the same or a smaller indentation than the foldable line. EditPad Pro nests folding points this way up to three levels deep. Further levels down are only added if the foldable range is longer than half the number of lines that EditPad Pro can display at a time.
Note that when enabling automatic folding points, you can still use the Fold|Fold to fold different blocks of text. They just won’t persist when you unfold them and edit the file.
The “show indentation indicators” checkbox determines the default state of the Options|Visualize Indentation menu item for each file type. When on, EditPad Pro indicates indentation levels with vertical lines or colored backgrounds. These indicators can help you to see whether the indentation in your file is correct and consistent.
The menu item only lets you toggle indentation indicators on or off. Exactly which lines get indentation indicators is determined by the settings in the Indentation Indicators group in the file type configuration. The drop-down list gives you four options to choose on which lines indentation indicators start. If you pick one of the latter two then you can also choose whether indentation indicators may go through insufficiently indented lines or not.
Start an indentation indicator on every line that is indented further than the preceding non-blank line at the indentation level of that preceding line. The indentation indicator stops at the last non-blank line that is indented further than the indicated indentation level.
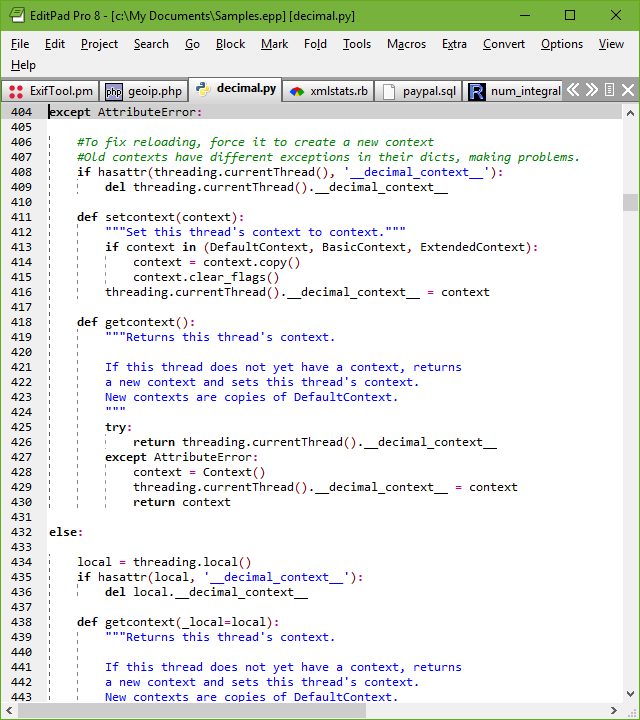
The difference between this option and the next one is essentially that this option does not add indentation indicators on blank lines before and after an indented block. Indentation indicators do run through blank lines in the middle of the indented block they’re indicating. You can see the difference between the screen shots above and below most obviously around the non-indented “else:”.
Showing indentation indicators on all lines is the best option for file formats where the indentation itself determines the block structure of the file and there is no line to close the block that is indented at the same level as the line starting the block. EditPad Pro uses it by default for the Python file type.

Start an indentation indicator below every line at that line’s indentation level if that line is followed by one or more lines that are indented further than that line. The indicator stops before the first line that is indented by the same amount or less than the line below which the indicator started. Indentation indicators run through all blank lines in between.
This option is useful as a fallback for file formats where you do have braces or keywords around blocks but for which you don't have a syntax coloring scheme to match up those braces or keywords nor a file navigation scheme to turn blocks into foldable ranges.

Start an indentation indicator below every line that has an opening bracket that is paired with a closing bracket on a later line, indicating the indentation level of the line the opening bracket is on even if the bracket is not at the start of its line.
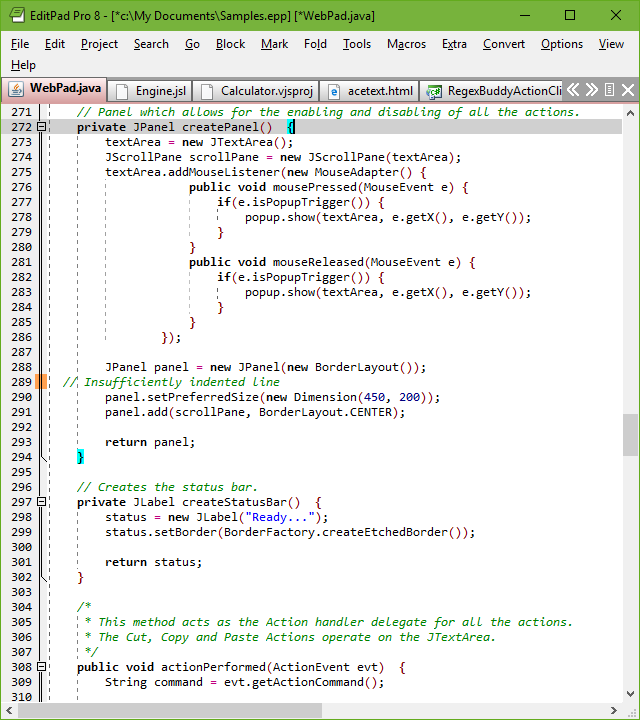
Indentation indicators run until the line that the paired closing bracket is on. If any lines between the line with the opening bracket and the closing bracket are not indented beyond the line with the opening bracket then the option to allow indentation indicators to go through insufficiently indented lines determines whether the indentation indicator stops on the line before the insufficiently indented line or whether it goes through that line to continue until the line with the closing bracket. The above two screen shots show how the indentation indicator either stops before or goes through the insufficiently indented comment.
Showing indentation indicators on lines surrounded by matching brackets makes it very easy to spot whether all your blocks are correctly nested and indented and whether all your braces are correctly paired. All of EditPad Pro’s predefined file types that have a syntax coloring scheme that supports bracket matching use this option.


Start an indication indicator below every line that starts a foldable range at the indentation level of that line. The indentation indicator stops at the last line in the foldable range. This works equally with automatic folding points (as configured above) and blocks that you’ve manually folded with Fold|Fold.
If any lines in the foldable range are not indented beyond the first line in the range then the option to allow indentation indicators to go through insufficiently indented lines determines whether the indentation indicator stops on the line before the insufficiently indented line or whether it goes through that line to continue until the last line in the foldable range. The above two screen shots show how the indentation indicator either stops before or goes through the insufficiently indented comment.
As you can see in the screen shots, with EditPad Pro’s Java file type, showing indentation indicators based on folding produces very similar results to indentation indicators based on brackets because the Java syntax coloring scheme matches up braces as brackets and the Java file navigation scheme matches up braces as foldable ranges. The screen shots show fewer indentation indicators based on folding because the automatic folding points were set to exclude detailed folding points.
To change the color and visual style of the indentation indicators, customize the color palette and change the “Editor: Indentation level 1” through “Editor: Indentation level 4” colors. You can have 4 different colors for the indentation indicators to make it easier to follow deeply nested indentation. The 4 colors are cycled every 4 indentation levels. EditPad Pro can show indentation indicators up to 63 levels deep. You can make colors 1 and 3 as well as 2 and 4 the same if you want to have two alternating colors for indentation indicators. Or you can make all 4 the same if you want the indicators to be more subtle.
Selecting a vertical style for the indentation levels in the color palette makes indentation indicators appear as vertical lines. Selecting a background color applies that background color to the spaces and tabs used for indentation, whether they are visualized or not. If you allow indentation indicators to go through insufficiently indented lines then the text color of the indentation levels is applied to the insufficiently indented text.
When you press F1 in EditPad Pro, normally EditPad Pro’s help file appears. But if you enable keyword help for a file type, and the main editor has keyboard focus when you press F1, then EditPad Pro can show help for the file type you’re working with. If you selected a block of text that does not span more than one line before pressing F1, EditPad Pro shows help for the selected text. Otherwise, it shows help for the word under the cursor.
If you specify the full path to a HLP or CHM file, EditPad Pro automatically looks up the selected text or the word under the cursor in the index of the HLP or CHM file. You can click the (...) button to select a HLP or CHM file on your computer. If you are running Windows Vista or Windows 7 and you specify a HLP file, you may be prompted to download the WinHelp viewer from Microsoft if you haven’t done so already.
You can also specify the URL to a web page. If you do, use the %KEYWORD% placeholder in the URL. EditPad Pro substitutes this placeholder with the selected text or the word under the cursor. If you want to start a Google search when you press F1, for example, set the URL to http://www.google.com/search?q=%KEYWORD%. EditPad Pro automatically URL-encodes any special characters in the selected text.
Finally, you can specify the path to any document or a command line to any application, including command line parameters. You can use the %KEYWORD% placeholder anywhere on the command line. EditPad Pro substitutes the placeholder without giving special treatment to any characters in the selection or the word under the cursor.