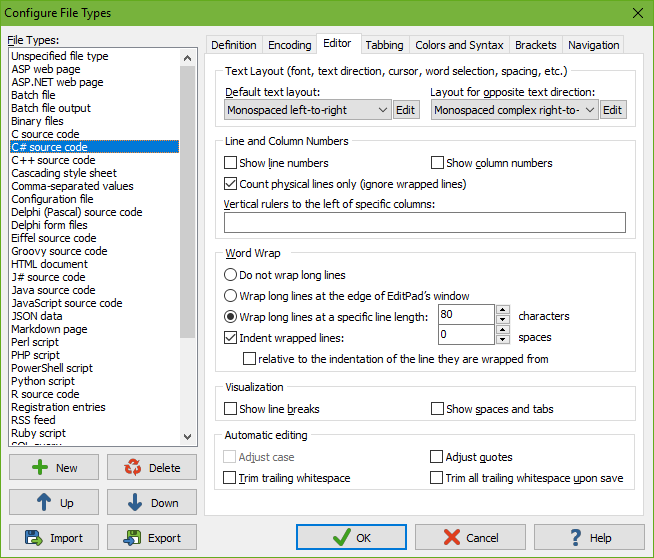
On the Editor tab in the file type configuration, you indicate the default editor options for each file type. Many of these options can be changed for individual files via the Options menu. The Options menu only affects a single file. The file type configuration sets the default.
In EditPad, a “text layout“ is a combination of settings that control how text is displayed and how the text cursor navigates through that text. The settings include the font, text direction, text cursor behavior, which characters are word characters, and how the text should be spaced.
You can select two text layouts for each file type. The “default text layout” is used when you first open a file of this file type. It can be a left-to-right or right-to-left text layout. The “layout for opposite text direction” is used when you turn on Options|Right-to-Left. This layout must be right-to-left if the default is left-to-right, and left-to-right if the default is right-to-left.
You can select previously configured text layouts from the drop-down lists. Click the Edit button next to the list to edit the text layout configurations. The list of text layouts is shared by all file types. If you edit a text layout configuration that is used by multiple file types, the changes apply to all those file types.
See the section describing the Options|Text Layout menu item for a full explanation of the text layout configuration screen.
Turn on “show line numbers“ to have EditPad display a number before each line in the left margin. In that case, you need to indicate if you want visible lines or physical lines to be numbered. This only makes a difference when word wrapping is on. When numbering visible lines, each line is counted, including lines created by the word wrapping. When numbering physical lines, the lines are numbered as if word wrapping would be off. You can toggle line numbering for a single file with Options|Line Numbers.
Turn on “show column numbers” if EditPad should display a horizontal ruler above the file indicating column numbers. You can toggle this for a single file with Options|Column Numbers. Column numbers are only displayed when using a fixed-width font.
In the box labeled “vertical rulers to the left of specific columns” you can enter a comma-delimited list of column numbers. EditPad will draw a vertical line to the left of the columns you enter. This makes it easier to work with files that use a columnar layout. You can put a + before a number to make that column relative to the previous column. E.g.: 10,+5,+5,37,+7,+12 would be equivalent to 10,15,20,37,44,56.
The word wrap setting determines what happens with lines that are too long to fit inside EditPad’s window. If you don’t want long lines to wrap, they will extend beyond EditPad’s window and be partially invisible. A horizontal scroll bar will appear.
You can make long lines wrap either at the edge of EditPad’s window, or at a specific line length. When wrapping at the window edge, lines will be automatically re-wrapped when you resize EditPad. When wrapping at a specific line length, horizontal scrolling may still be needed if the specified length doesn’t fit inside EditPad’s width.
It is usually convenient to wrap at the window edge, as it eliminates the need for horizontal scrolling. You’ll probably want to turn it off for files that use a line-based structure such as software source code, so the word wrapping doesn’t confuse your view of the lines. Note that EditPad’s word wrapping is fully dynamic. Line breaks introduced by the word wrapping are not saved into the file at all, unless you use Convert|Wrapping ⇒ Line Breaks. So there’s no risk at data loss when turning on word wrap for line-based files.
If you turn on “wrapped lines should maintain indentation”, lines created by the word wrapping are indented a certain number of spaces. Enter a positive number of spaces. If you also tick “relative to the indentation of the line they are wrapped from” then they are by the same amount as the line they were broken off from, plus or minus the number of spaces you enter (which can be zero). If you turn it off, wrapped lines will start at the first column regardless of the indentation of the original line. Turning on this option is useful when turning on word wrap for files using nested block structures, such as XML files and various programming languages.
Word wrap can be toggled for individual files with Options|Word Wrap and Options|Indent Wrapped Lines.
Turn on “show line breaks“ if you always want to see a ¶ character at the end of each paragraph, indicating the invisible line break character(s). Note that if line break characters are selected, the paragraph symbol will always appear to show you that they have indeed been selected. You can quickly change this option by picking Options|Paragraph Symbol from the menu.
Select “show spaces and tabs“ if you want spaces and tabs to be visualized. Spaces will be indicated by a vertically centered dot. Tabs are indicated by a » character. This option is useful when working with files where extraneous whitespace can lead to problems, or where the difference between tabs and spaces matters. You can quickly toggle it by picking Options|Visualize Spaces from the menu.
Turn on “adjust case” if you want the case conversion rules specified by the syntax coloring scheme to be applied automatically to text that you enter. This option is disabled if the scheme you selected on the Colors and Syntax page does not specify any case conversion rules. This option determines the default state of the Convert|Case|Auto Adjust Case menu item. See the topic on that menu item for more details on automatic case conversion.
Turn on “adjust quotes” if you want the quote conversion rules specified by the syntax coloring scheme to be applied automatically to text that you enter. This option is disabled if the scheme you selected on the Colors and Syntax page does not specify any quote conversion rules. This option determines the default state of the Convert|Quotes|Auto Adjust Quotes menu item. See the topic on that menu item for more details on automatic quote conversion.
Turn on “trim trailing whitespace” to automatically trim whitespace from the end of any line that you edit when you move the cursor away from that line. This option does not trim trailing whitespace that was already present in the file from lines that you don’t edit. You can toggle this for the active file with Extra|Auto Trim Trailing Whitespace.
Turn on “trim all trailing whitespace upon save” to automatically invoke Extra|Trim Trailing Whitespace when you save a file. This trims all trailing whitespace from all lines.