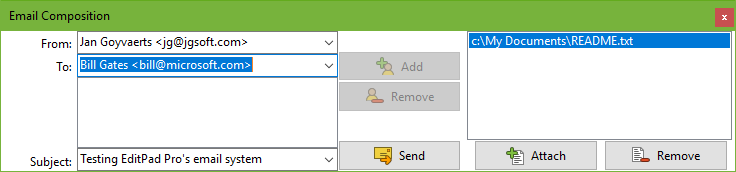
Select File|Mail from the menu to send the current file to somebody via email. The email composition panel is shown.
Type in your full name followed by your own email address in the field labeled “From”. If you have previously used the email function, you can quickly select your email address from the drop-down list.
Then type in the recipient’s email address in the “To” field. You can either enter the recipient’s full name followed by his or her email address, or you can enter only the email address.
If you want to send your message to more than one recipient, click the Add button next to the “To” field to add the first email address to the list. Then type in the second email address into the “To” field, and click the Add button again. Do so for all recipients. If you make a mistake, you can remove a recipient by selecting his or her email address from the list and clicking the Remove button.
In the “Subject” field, type in the subject of the email message.
If you want to attach files to the email message, click the Attach button. Select the file you want to send. You can attach more than one file if you want to. If you change your mind about attaching a file, click on it in the list and click the Remove button below the list of attachments.
The Send or Enqueue button does not become enabled until you type in your email address, the recipient’s email address, and the message’s subject. When you click the Send button, the email is placed in the mail queue and sent out immediately. When you click the Enqueue button, the email is added to the mail queue. But it won’t be sent until you click the Send button in the mail queue. Which of the two buttons appears depends on the option to send out email immediately in the Email Preferences.
Before you can actually send mail, you need to specify the outgoing mail server that EditPad Pro should use in the Email Preferences. If you haven’t done this yet, clicking the Send button brings up the Preferences screen.
The mail queue panel appears after you click the Enqueue or Send button in the mail composition panel. Each time you click the Enqueue or Send button, another email message is added to the bottom of the mail queue. The messages are marked as “queued”.

Click the Send button in the mail queue to start sending the messages in the queue. EditPad Pro begins with the first message in the queue marked as “queued”. EditPad Pro always starts sending the first message, no matter which message you selected in the queue before clicking the Send button. When the first message has been sent, EditPad Pro continues with the next, until all queued messages have been sent. The message that is being sent is marked as “sending”. After it has been sent, it will either be marked as “sent” in case of success, or “failed” in case the message could not be sent. While email is being sent, EditPad Pro tells you what is happening in the caption bar above the queue. The caption indicates “Email Queue” if you have not sent anything yet.
To remove a message from the queue, select it and click the Delete button. You can delete any message, even while EditPad Pro is sending email . Only the message that is currently being sent (if any) cannot be deleted from the queue. If you want to delete all successfully sent messages from the queue, click the Close button.
If EditPad Pro could not send a particular message, it will be marked as “failed”. If you want to try the message again without making any changes to it, select it and click the Retry button. This marks the message as “queued”. You can do this whether EditPad Pro is sending messages or not. Alternatively, you can cancel sending the message by deleting it from the queue. EditPad Pro does not automatically retry failed messages. You have to mark them again as “queued”.
To move a message up or down in the queue, select it and click the Move Up or Move Down button. You can move any message, regardless of its status. However, the order of the messages only matters for those marked as “queued”. The first one in the list is the one that will be sent next, regardless of which message is currently being sent (if any).
Click the Close button to close the mail queue panel. This also deletes all successfully sent messages from the panel. The only way to make the mail queue appear again after closing it, is to add another message to the queue through the mail composition panel. Therefore, you cannot close the mail queue while email is being sent. If the panel takes up too much space, click on the minimize button on the caption bar below the queue. This hides the list of messages and the buttons, but not the caption bar. This allows you to continue monitoring the progress in the caption bar, and to see the queue again by clicking the minimize button turned restore button again.
Note that the email queue sends email in the background. This means that you can continue using EditPad Pro as usual, including composing new emails, while email is being sent. This is particularly useful when sending large attachments over a slow connection. The only function you cannot use is File|Exit.